|
|
Got cold spots in your radiators? Click
here for more information about our central heating PowerFlush service. |
|
|
|
|
|
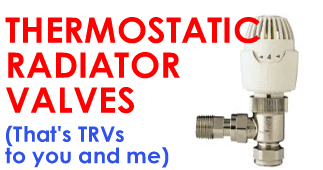
WHAT ARE TRVS?
Thermostatic Radiator Valves (or 'TRVs') can automatically
turn down radiators when rooms reach your chosen temperature,
turning them back up again when the temperature in the room drops. It's
as simple as that!
We can replace your ordinary radiator valves with TRVs which will help to make your
whole central heating system more efficient, saving money on your gas bills and boiler
maintenance.
Call us now for a free estimate! |
|
|
|
|
|

Are your radiator valves stuck or leaking onto your flooring
or carpets?
A lot of radiator valve problems can be solved with a few simple steps and some common
sense.
Here's how to tackle some of the common faults with radiator valves, but before you
start, make sure you know how to turn off the water supply to your property and that
your mains stopcock is working in case things go wrong!
And of course, if you are still having problems with your radiator valves after trying
these tips, call us!
|
|
|
|
HELP: MY RADIATOR VALVES LEAK!
-
Step 1: Isolate the heating system. Turn off your heating,
preferably at the fused spur controlling power to the timer (if fitted) or at least
turn off the timer. This is to prevent the pump coming on whilst you are working on
the valve.
-
Step 2: Put down a dust sheet or other floor protection
under the leaky valve (just in case you make the leak worse rather than curing it!),
then take the plastic top off the valve.
-
Step 3: Identify the source of the leak. Working from
the top of the valve down, wipe a finger along the valve and look to see when your
finger gets wet (watch out for sharp edges!).
A wet finger at the top of the valve signifies a leaky packing gland. A wet finger
from under the valve or at the joint with the radiator usually means a loose securing
nut.
-
Step 4: Leaky packing glands: Use an adjustable spanner
to grip the hexagonal nut on the top of the valve where the spindle comes out of the
valve body.
Turn the nut a little - just the equivalent of one point on the clock face, e.g. from
1 o'clock to 2 o'clock. Wipe the joint dry and watch for any further leaks.
Repeat the process if necessary, but don't turn the nut too many times or you won't
be able to turn the spindle to turn the radiator on and off.
-
Step 5: Loose securing nut: Use a pair of pump pliers
or mole grips to hold the body of the valve steady then slip an adjustable spanner
over the loose nut.
Turn the nut a quarter turn tighter (the direction to turn the nut will depend on
where it is fitted, but you'll soon know if you are turning it the wrong way if it
gets easier to turn and water starts to appear!).
Wipe the joint dry and watch for any further leaks. Repeat the process if necessary,
but don't turn the nut too many times or you may damage the joint sealing collar (known
as an 'olive') inside the nut.
-
Step 6: Turn the heating system on again and check for
leaks from your valve.
|
|
HELP: MY RADIATOR VALVE IS STUCK!
-
Step 1: Isolate the heating system. Turn off your heating,
preferably at the fused spur controlling power to the timer (if fitted) or at least
turn off the timer. This is to prevent the pump coming on whilst you are working on
the valve.
-
Step 2: Put down a dust sheet or other floor protection
under the valve (just in case you start a leak).
-
Step 3: If the valve is thermostatic. Turn the valve
head to the maximum setting, hold the head of the valve and turn the securing ring
(usually a silver ring under the valve head) anti-clockwise to release the head.
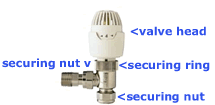
Thermostatic valve components |
Lift off the head to see the valve actuating pin on the top of the valve body.
Take a small hammer and tap gently on the pin until it rises up (don't hit the pin
any harder than you would hit the keys on a very expensive concert piano!).
Once the pin rises replace the head and tighten the securing ring.
-
Step 4: If the valve is not thermostatic: Remove the
plastic top (some are held on with a screw, others just pull off) so you can see the
brass spindle.
Use an adjustable spanner to grip the flat head of the spindle.
Gently turn the spindle alternatively in a clockwise and anti-clockwise direction
to release it until you can turn the spindle freely.
Rotate the spindle fully from open to closed (usually between 3-5 turns depending
on the brand of valve) then refit the valve cap.
|
|
|
|
*DISCLAIMER - IMPORTANT: PLEASE READ
This article is provided for information purposes only. You should only attempt any
procedures explained here if you are competent to perform the task and have the appropriate
tools and materials, including any relevant safety equipment.
Readers acting upon this article do so at their own risk and no responsibility is
accepted by the author or publisher for any loss or damage incurred by following the
article or failing to follow it.
If in doubt always consult a properly qualified tradesperson or other competent person.
|
|
© Legal Mumbo Jumbo Contact
Us Site Map
|